
Table of Contents
- What You’ll Need Before Starting
- Electric Underfloor Heating Floor Preparation
- How to Install Underfloor Heating Mats
- Electric Underfloor Heating Thermostat Installation
- Testing Electric Underfloor Heating
- Finishing and Safety Considerations
- Common Installation Mistakes to Avoid
- Frequently Asked Questions
Last Updated: October 19, 2026
What You’ll Need Before Starting
Installing electric underfloor heating requires careful planning and the right materials. Before you begin, gather everything you’ll need to complete the job properly.
Essential tools and materials include:
- Electric heating mats or cables (sized for your space)
- A thermostat and temperature sensor
- Insulation board or reflective underlay
- Adhesive suitable for your flooring type
- Cabling and conduit for electrical connections
- A multimeter for testing
- Safety equipment: gloves, goggles, dust mask
- Measuring tape and marker pen
- Tiling trowel (if installing under tile)
The specific requirements depend on your floor type and room size. Flexel’s range of electric underfloor heating systems comes with detailed specifications for each installation type. Before ordering materials, measure your room accurately and identify which areas need heating. This prevents waste and ensures you have enough coverage.
Safety considerations at this stage:
- Turn off power to the room at the circuit breaker
- Never work on electrical systems without proper training
- Consult Building Regulations guidance for electrical safety requirements
- Have a qualified electrician handle final connections if you’re unsure
Planning ahead saves time and reduces installation errors. If you’d like professional guidance on your specific project, a free quotation can help you understand the scope and requirements before you start.
Electric Underfloor Heating Floor Preparation
Proper floor preparation is critical. A poorly prepared surface leads to installation problems and reduced heating efficiency.
Start by clearing the room completely. Remove all furniture, carpets, and fixtures. Inspect the existing floor for damage, cracks, or uneven areas. Fill any significant gaps with self-levelling compound. The surface should be clean, dry, and as level as possible.
For concrete floors, sweep thoroughly and remove any dust or debris. Moisture is your biggest enemy at this stage. Use a moisture meter to check that concrete hasn’t absorbed excess water. Concrete should sit for at least 28 days after pouring before installing underfloor heating. If moisture levels are high, allow more drying time or consider a moisture barrier.
For wooden floors, check for movement or warping. Wood expands and contracts with temperature changes. Ensure the subfloor is solid and well-ventilated underneath. Avoid installing electric underfloor heating directly on certain types of wood without proper thermal separation.
Lay insulation next. This reflects heat upward into your room rather than wasting it downward. Reflective underlay or insulation board should cover the entire floor area. Secure it with tape or adhesive designed for this purpose. Proper insulation can improve heating efficiency significantly, so don’t skip this step.
The final check involves ensuring your floor is ready to receive the heating mat. It should be clean, dry, level, and insulated.
How to Install Underfloor Heating Mats
Laying Out Your Heating Mat
Unroll your heating mat carefully across the prepared floor. Start in one corner and work systematically across the room. Never fold, cut, or overlap the heating elements themselves, only the backing can be trimmed if needed.
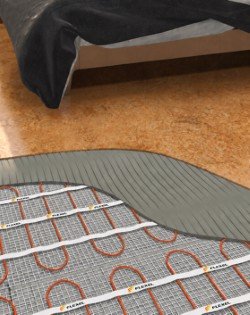
Plan your layout before starting. When you install electric underfloor heating, avoid placing mats under fixed furniture or appliances. Leave a 10-15cm gap around the edges of the room and around any permanent fixtures. This allows for expansion and prevents overheating in confined spaces.
Heating mats come in different widths. Choose a layout that minimises cutting and waste. Some rooms work better with mats running lengthwise; others benefit from a different orientation. Sketch your plan on paper first to visualise the best approach.
For rooms with awkward shapes, you may need to cut the backing material to fit corners or around doorways. Use a craft knife to cut only the backing, never cut through the heating element itself. Once you’re happy with the layout, you’re ready to secure it.
Securing the Mat to the Floor
Use adhesive suitable for your flooring type. Spread it evenly across the floor using a notched trowel. Press the mat firmly into the adhesive, working from one end to the other to eliminate air pockets.
Check frequently as you work:
- Ensure the mat sits flat with no wrinkles or gaps
- Verify the heating element remains uncut and undamaged
- Confirm the thermostat sensor is positioned correctly (usually in the middle of the mat)
Allow the adhesive to cure fully before proceeding. Follow the manufacturer’s instructions for drying time, typically 24 hours. Don’t rush this stage; poor adhesion causes installation failures and safety hazards.
Some installations use self-adhesive mats that stick directly to the floor. These speed up the process but require an extremely clean, dry surface. Either way, the mat must be secure and level before the next stage.
Electric Underfloor Heating Thermostat Installation
Positioning Your Thermostat
The thermostat controls your heating system and regulates temperature. Its position affects how well your system responds to room conditions.
Mount the thermostat on an interior wall, roughly 1.4 metres from the floor. Avoid external walls, direct sunlight, and draughty areas. Position it away from heat sources like radiators or windows. These factors influence temperature readings and reduce system efficiency.
The temperature sensor (a thin probe) runs from the thermostat down to the heating mat. It’s usually embedded in the mat during installation. Some systems use a separate sensor placed between the mat and the flooring material. Follow your specific system’s guidance carefully.
Test the sensor before finalising the installation. Use a multimeter to confirm electrical continuity. This simple check prevents problems later.
Wiring and Electrical Connections
Electrical connections must be done correctly. Improper wiring creates fire hazards and system failures.
If you’re not confident with electrical work, hire a qualified electrician. Building Regulations require that fixed electrical installations meet specific safety standards. A professional ensures your system complies and functions safely.
The thermostat connects to your heating mat via low-voltage wiring. This wiring must be protected within conduit or trunking. Run cables along walls or under the floor, keeping them away from sharp edges that could damage insulation.
Connect the system to an appropriate circuit breaker. The circuit should be dedicated to the underfloor heating system. Shared circuits risk overload and tripping. A residual current device (RCD) provides additional protection against electrical faults.
Once all connections are complete, test the system before covering the mat with flooring. This is your last chance to identify and fix problems.
Testing Electric Underfloor Heating
Before installing your final flooring layer, test the entire system thoroughly.
Perform these checks:
- Use a multimeter to test all electrical connections for continuity
- Verify the thermostat responds to temperature changes
- Confirm the heating mat generates warmth when powered on
- Check that the temperature sensor reads accurately
- Ensure the RCD trips when tested with its test button
Turn the system on and let it run for 15-30 minutes. Feel the floor surface; it should warm gradually. If any section remains cold, investigate before proceeding. Common causes include poor adhesion, damaged wiring, or incorrect connections.
Once testing confirms everything works, you can proceed to install your final flooring. The heating system remains underneath, hidden from view.
Finishing and Safety Considerations
Your final flooring layer goes on top of the heating mat. Tile, vinyl, laminate, or engineered wood all work well with electric underfloor heating. Follow the flooring manufacturer’s instructions, as some materials have specific temperature requirements.
Important safety points:
- Never cover the thermostat with furniture or soft furnishings
- Ensure adequate ventilation in the room
- Keep the system clear of water and moisture
- Have the installation inspected by a qualified electrician
- Keep documentation and warranty information safe
After installation, allow the flooring adhesive to cure fully before using the heating system. Most adhesives need 24-48 hours. Running the system too early can damage new flooring.
Flexel’s electric underfloor heating systems are designed for safe, reliable operation when installed correctly. Our products meet international safety standards including EN 60335-2-96 and IEC 60800. This ensures your system performs reliably for years to come.
Common Installation Mistakes to Avoid
Rushing the preparation stage. Many installers skip or hurry floor preparation. Poor preparation leads to uneven heating, mat damage, and adhesion failure. Spend time getting the foundation right.
Overlapping or folding the heating element. This creates hot spots and risks damaging the mat. The heating element must remain straight and uncut. Only the backing material can be trimmed if necessary.
Incorrect thermostat positioning. Placing the thermostat in draughty areas or direct sunlight gives false temperature readings. The system then overheats or underheats your room. Choose an interior wall away from external influences.
Skipping electrical testing. Many problems emerge during testing that are simple to fix beforehand. Skipping this stage means discovering issues after flooring is installed, far more costly and disruptive.
Using unsuitable adhesive. Different floor types require different adhesives. Using the wrong product means the mat won’t stick properly or the adhesive damages the heating element. Always follow the manufacturer’s recommendations.
Ignoring moisture issues. Excess moisture in concrete or wood causes electrical faults and reduces system life. Allow adequate drying time and use moisture barriers where needed.
Attempting electrical work without qualification. Building Regulations exist for safety. Improper electrical connections risk fire, electric shock, and system failure. Professional installation gives you peace of mind and compliance.
Installing electric underfloor heating transforms how your space feels. Proper installation ensures safety, efficiency, and reliable operation. The key is taking time with each stage, preparation, layout, securing, testing, and finishing. Rushing any step compromises results.
Flexel provides high-quality electric underfloor heating systems designed for straightforward installation. Our products come with clear guidance and support. For complex installations or if you’re uncertain about any stage, professional installation is always the safer choice.
To discuss your next project Contact Us to get the conversation started.
Flexel: Heating people first since 1978
Frequently Asked Questions
Can you install electric underfloor heating yourself?
Many homeowners can install electric underfloor heating mats independently, provided they follow safety guidelines and local building regulations. The mat installation itself is straightforward, but thermostat wiring and electrical connections should comply with Building Regulations Part P. If you’re unsure about electrical work, consult a qualified electrician. Professional installation ensures your system meets all safety standards and warranty requirements.
How do you prepare a floor for electric underfloor heating?
Begin by clearing the floor completely and inspecting for damage or unevenness. Fill any cracks or holes with self-levelling compound and allow it to dry fully. The substrate must be clean, dry, and level to within 3mm per metre. If your floor is uneven, use a self-levelling screed. Check for moisture using a calcium carbide test. Lay a thermal underlay to direct heat upwards and improve efficiency.
Does electric underfloor heating need an electrician?
The heating mat installation can be a DIY task, but electrical connections require a qualified electrician under Building Regulations Part P. Your electrician will ensure the thermostat is wired correctly, the system is earthed properly, and all connections meet current safety standards. They’ll also install an appropriate circuit breaker. Professional certification protects your property and ensures your installation is insurable and compliant.
How do you test electric underfloor heating before tiling?
Before laying tiles, perform a continuity test using a multimeter to check that the heating mat circuit is complete. Apply power and measure the mat’s resistance—this should match the manufacturer’s specification. Let the system run and feel the mat surface to confirm even heat distribution. Check that the thermostat sensor responds correctly to temperature changes. Document all test results. Never tile over a faulty mat.